KaHero POS includes an advanced inventory management system. Create purchase orders to your suppliers and track your POs through KaHero's advanced inventory management.
You can access KaHero POS's advanced inventory management in the Back Office.
Let's Get Started:
- Hover/click the box icon/Inventory Management > Purchase Order.
0:00
/0:21
Redirecting to Purchase Order
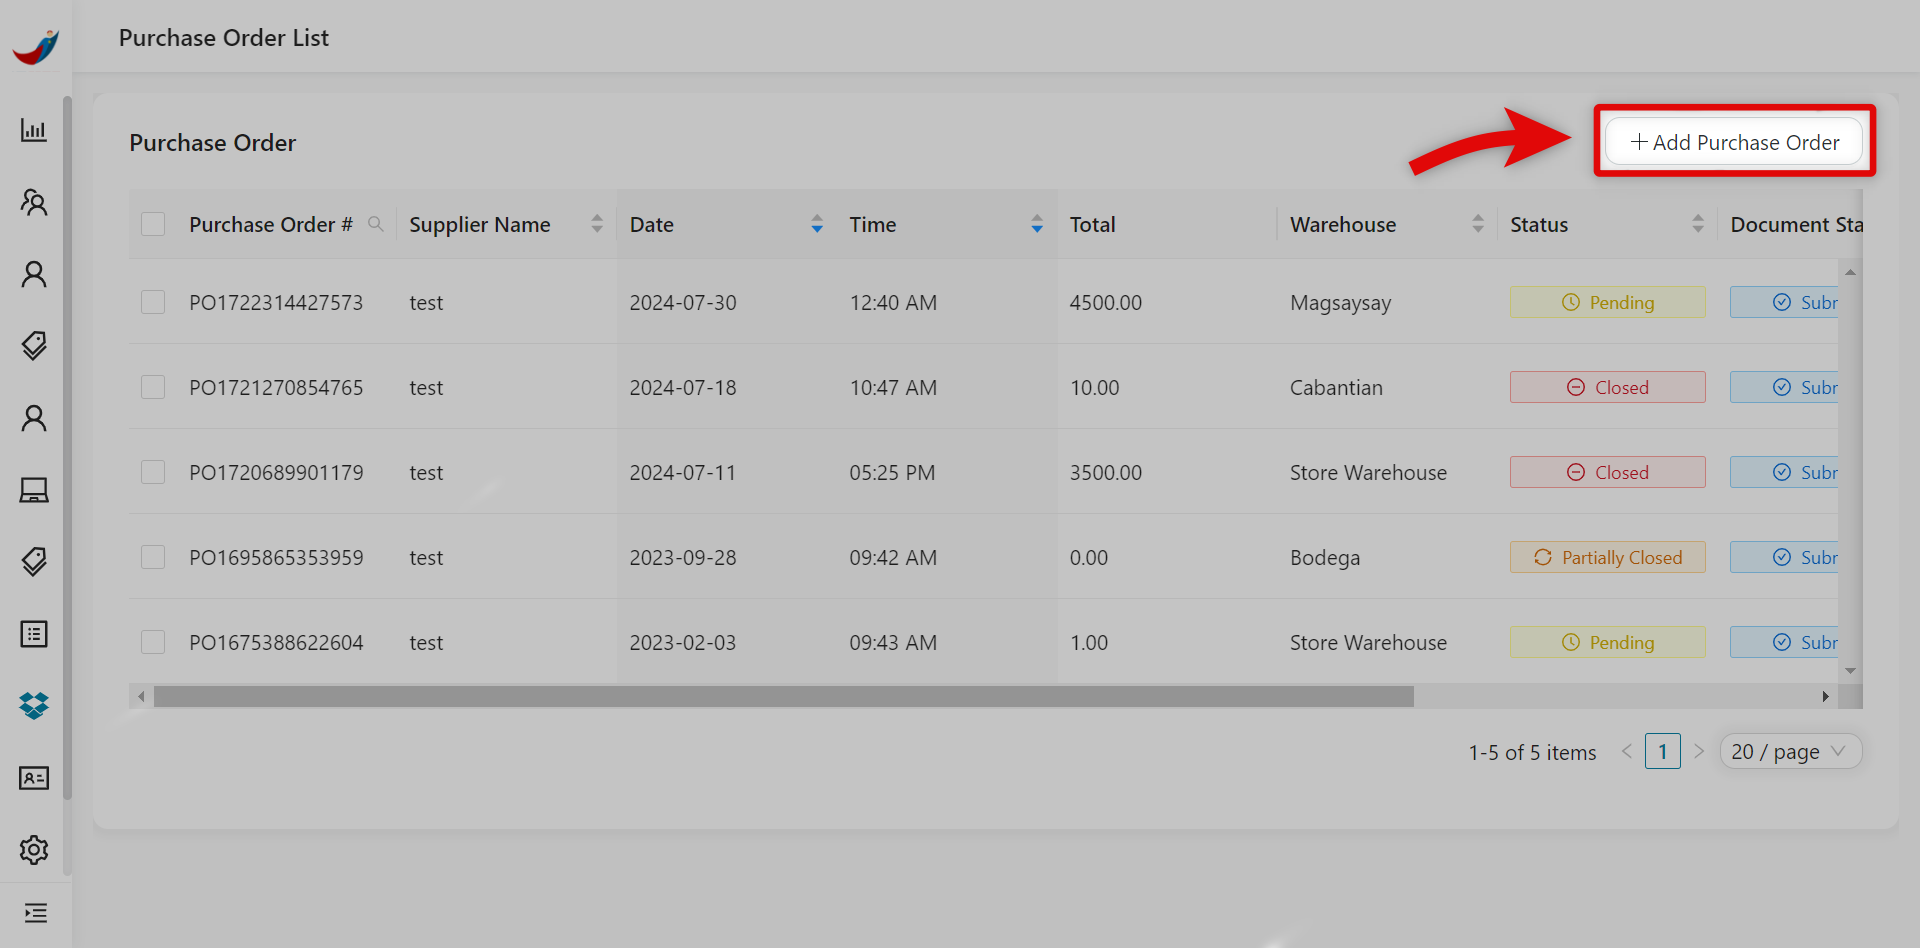
- Click Add Purchase Order on the upper right on your screen. A pop-up window will then appear.
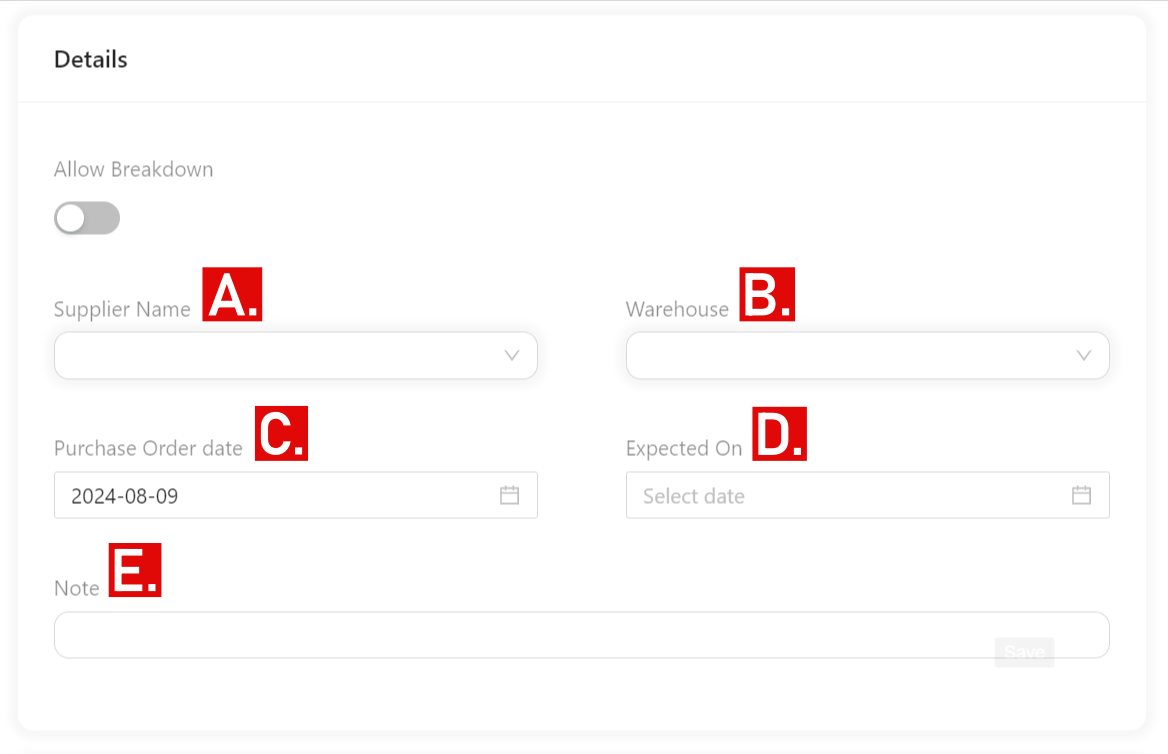
- Inside the Add Purchase Order pop-up window, Details tab, you can...
A. Supplier Name - choose the name of the supplier you want to purchase from.
B. Warehouse - choose which warehouse in your POS the items which you will be ordering is located.
C. Purchase Order date - choose the date you have placed your order.
D. Expected On - choose the expected date of when your order will arrive.
E. Note - input a note for your purchase order.
B. Warehouse - choose which warehouse in your POS the items which you will be ordering is located.
C. Purchase Order date - choose the date you have placed your order.
D. Expected On - choose the expected date of when your order will arrive.
E. Note - input a note for your purchase order.
💡
If you can't see your supplier under "Supplier Name, your franchise account must be linked to your supplier's account. If this connection hasn't been established, please ask your supplier to add your franchise to their account.
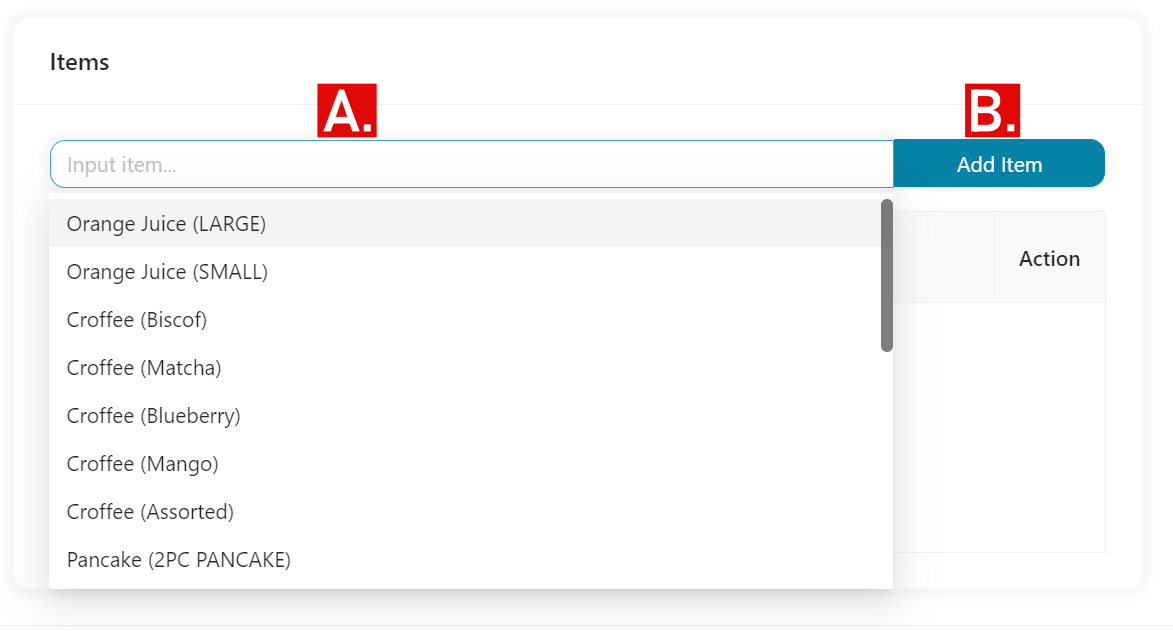
- Inside the Add Purchase Order pop-up window, Items tab, you can...
A. Items drop-down - choose which items in your warehouse you will be ordering.
B. Add Item button - press to add the item for purchasing.
B. Add Item button - press to add the item for purchasing.
- If done adding your items for purchasing, it should be added on the list below.
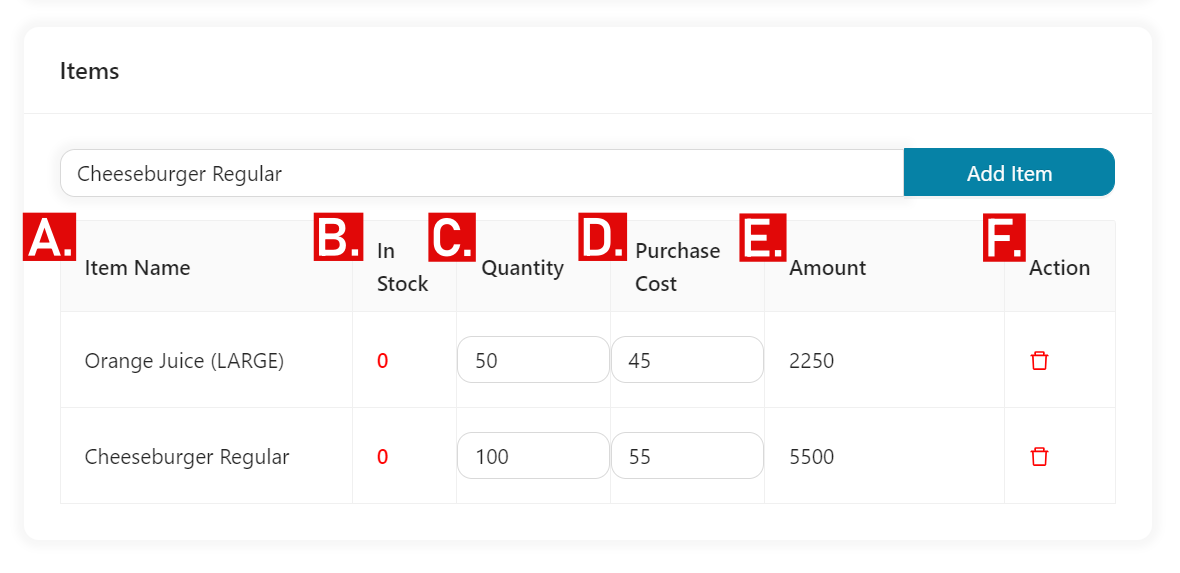
- On the Items table, you can see the following:
A. Item Name - name of your item.
B. In Stock - total stocks of your item.
C. Quantity - click on the number under the Quantity column to edit the quantity you would like to order.
D. Purchase Cost - click on the number under the Purchase Cost column to edit the cost of the item you will be ordering.
E. Amount - total amount of your stock (Quantity x Purchase Cost).
F. Action - delete the item on the list.
- If done, click Save.
- After clicking Save, you will be redirected back to Purchase Order List page.
- You will then see your newly added purchase order on the list.
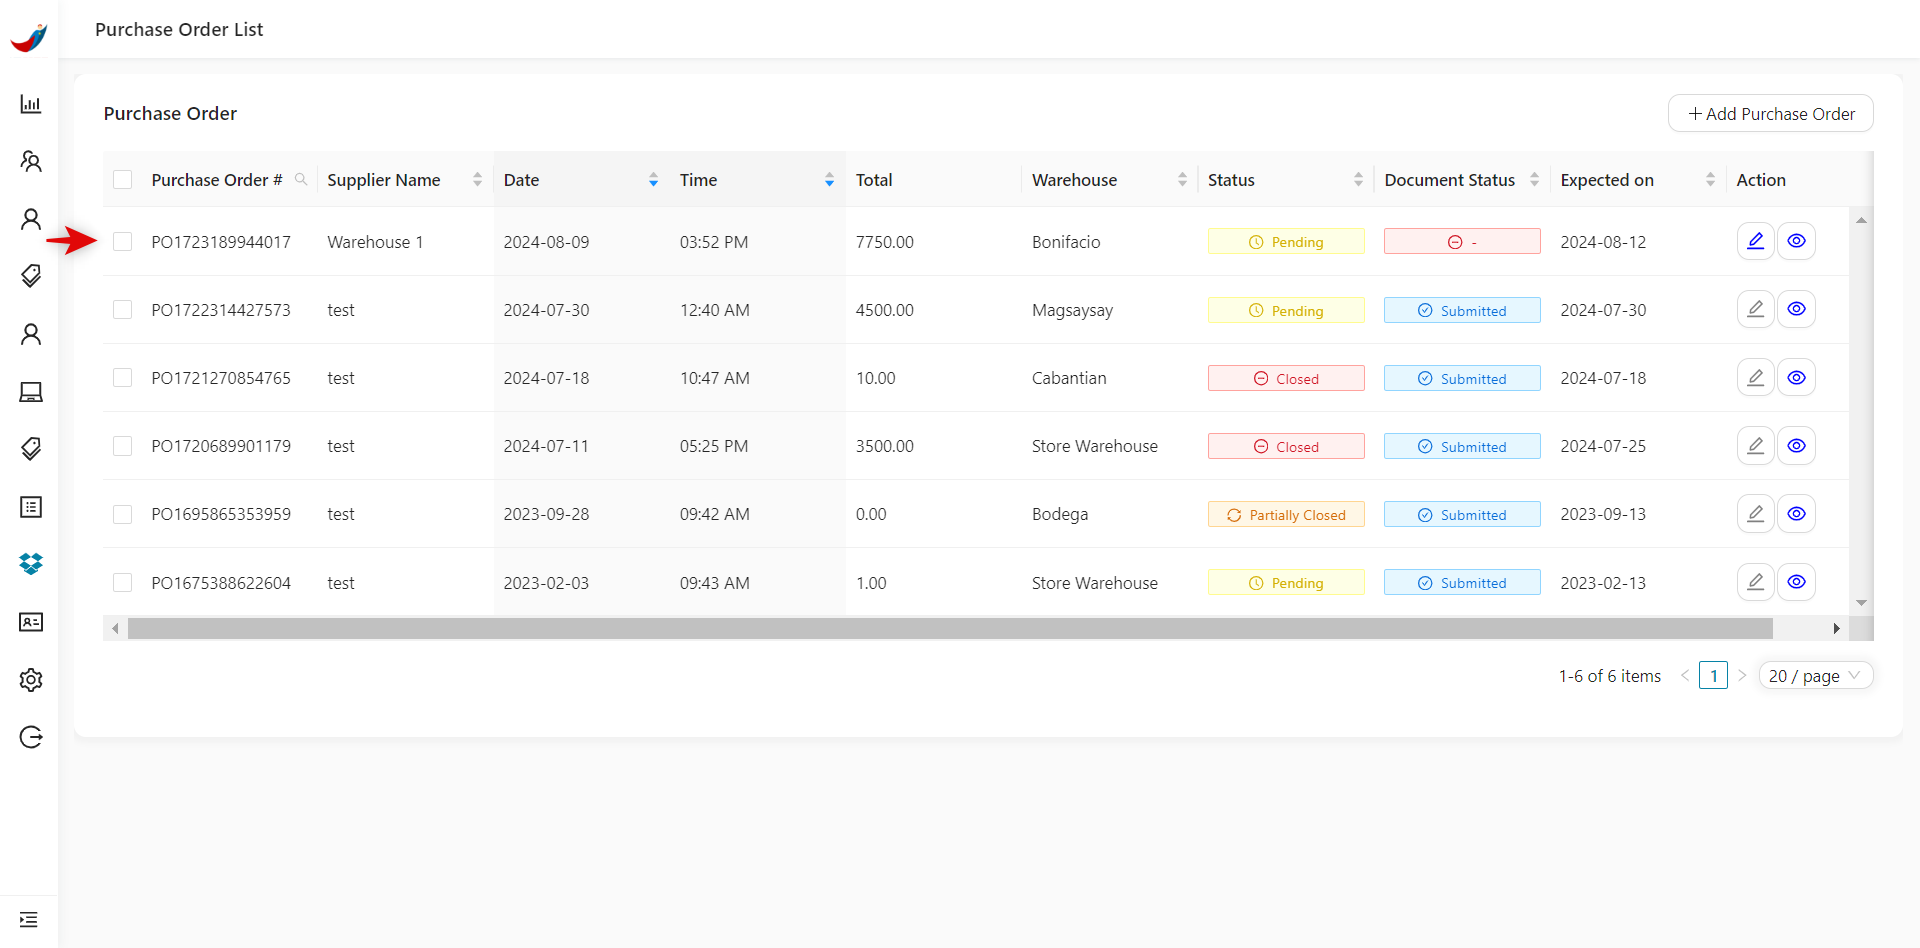
- Under Purchase Order, you can edit a supplier by clicking the checkbox before the Purchase Order #, and you can...
A. Add Purchase Order - add another purchase order.
B. Delete - delete purchase orders.
C. Edit - edit a purchase order.
D. View - view your purchase order.
B. Delete - delete purchase orders.
C. Edit - edit a purchase order.
D. View - view your purchase order.
💡
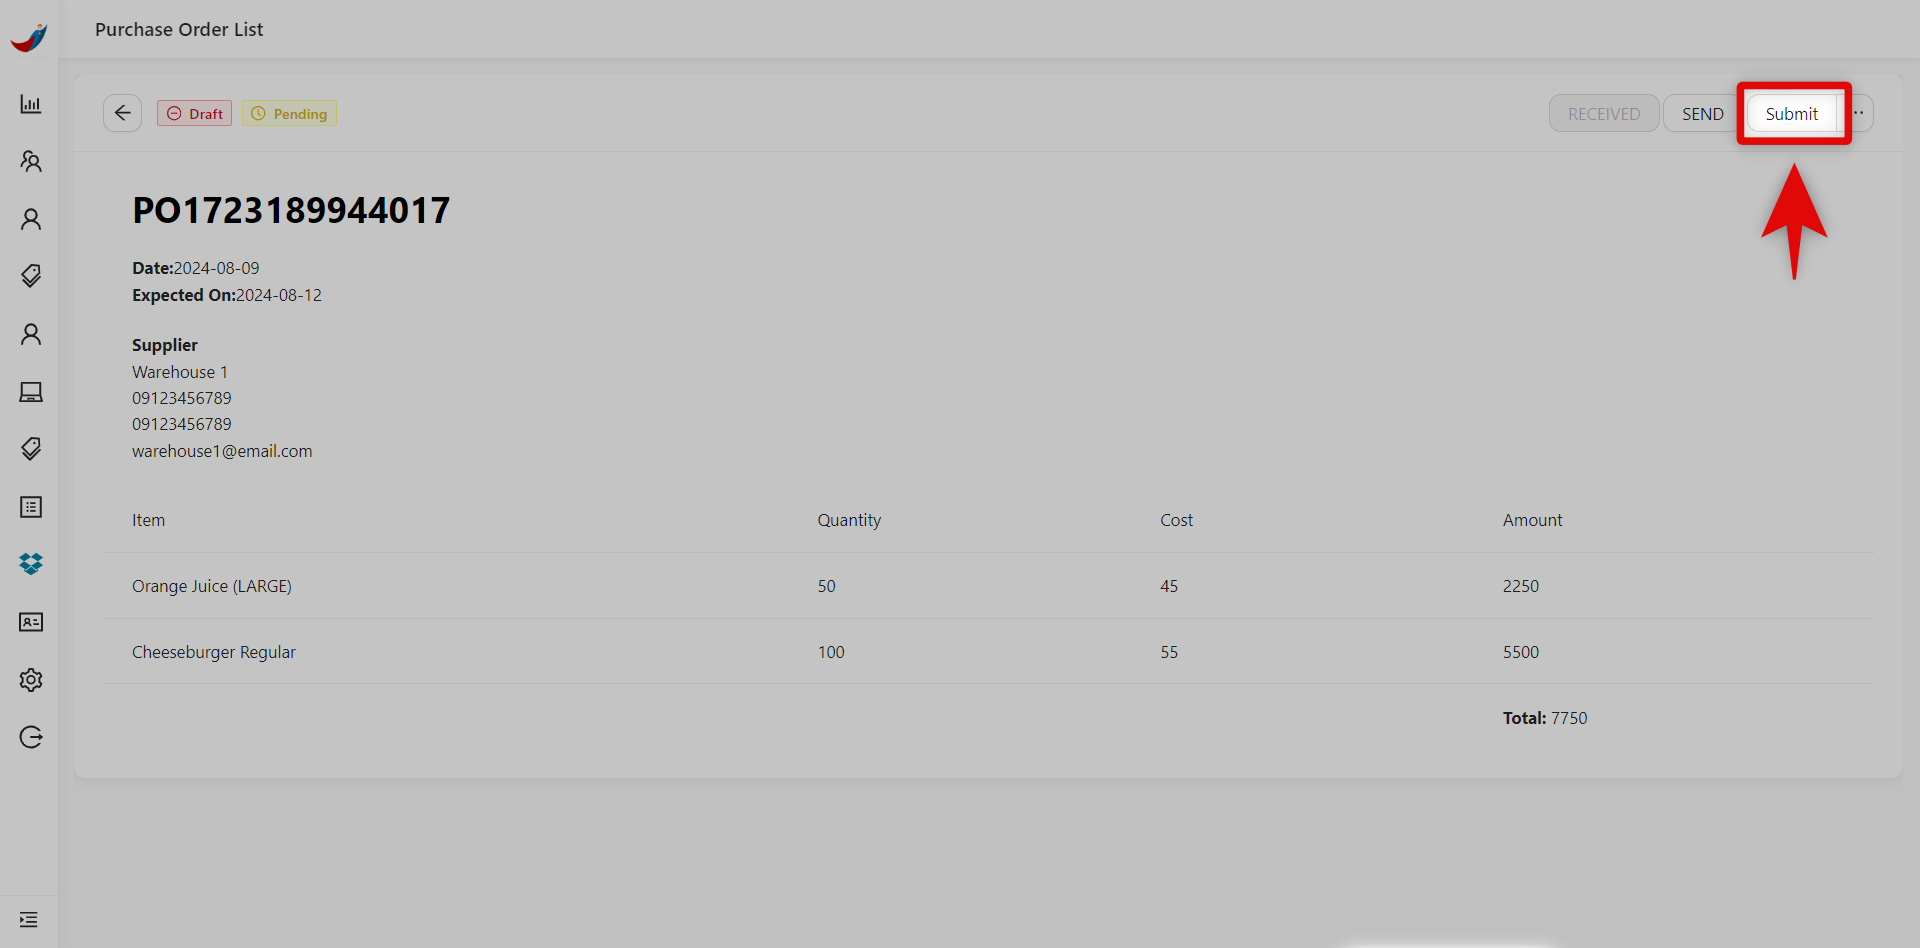
Notice the status under Document Status is 'Draft', click on the Eye icon to view or update order status.

- Click Submit to submit your order. Once you've submit the Document Status, it will update from Draft to Submitted.
😍
Great! You've just learned how to create your purchase order.
Receiving Purchase Orders
You can set your stocks/items as 'Received' from Franchisee and Supplier side.
Franchisee Side
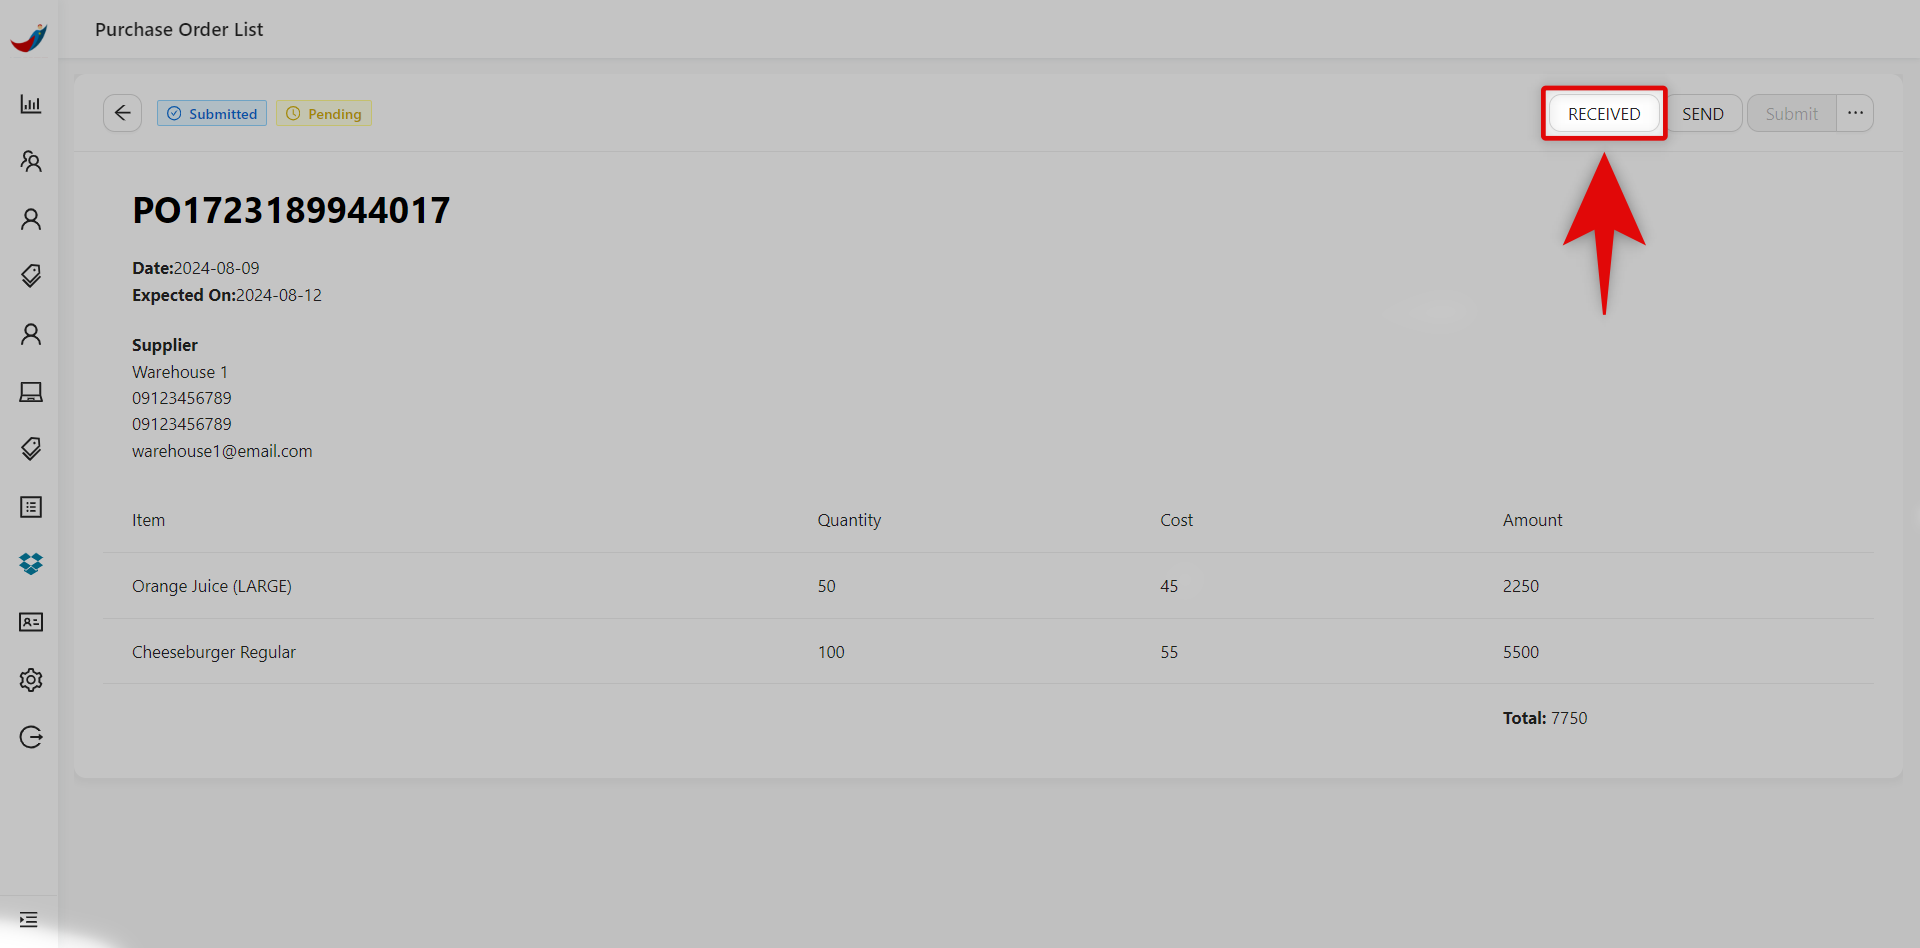
- Click the RECEIVED button to label your purchase orders as 'Received'. A pop-up window will then appear.
- Under Item Received, you will input the following:
A. To Received - input the number of items you have received from your supplier, or you can click Mark All Received if you received all your orders.
B. Expiration Date - input the expiration date of the received orders/stocks.
B. Expiration Date - input the expiration date of the received orders/stocks.
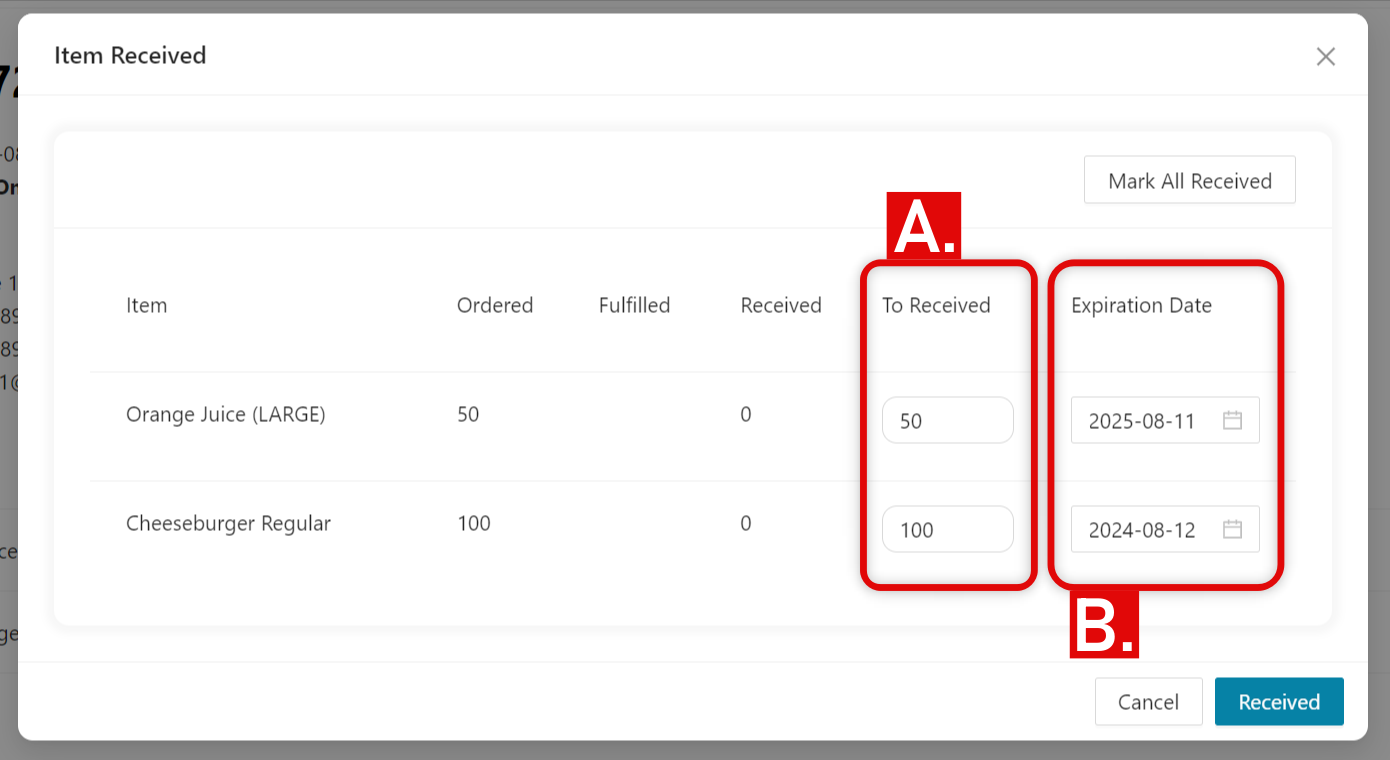
- Click Received to finish the receiving process. The purchase orders status will automatically be updated from Pending to Closed.
Supplier Side
- Hover or click the tag icon / Franchise > Franchisee PO.
0:00
/0:15
Redirecting to Franchisee List
- Inside the Franchisee PO tab, you can...
A. Franchisee - search or select a franchisee.
B. Start date ⇀ End date - set a start date and end date to view all orders on that certain date.
B. Start date ⇀ End date - set a start date and end date to view all orders on that certain date.

- Select on any Purchase Order you want to set as receive, and click on the eye icon or View under Action tab.

💡
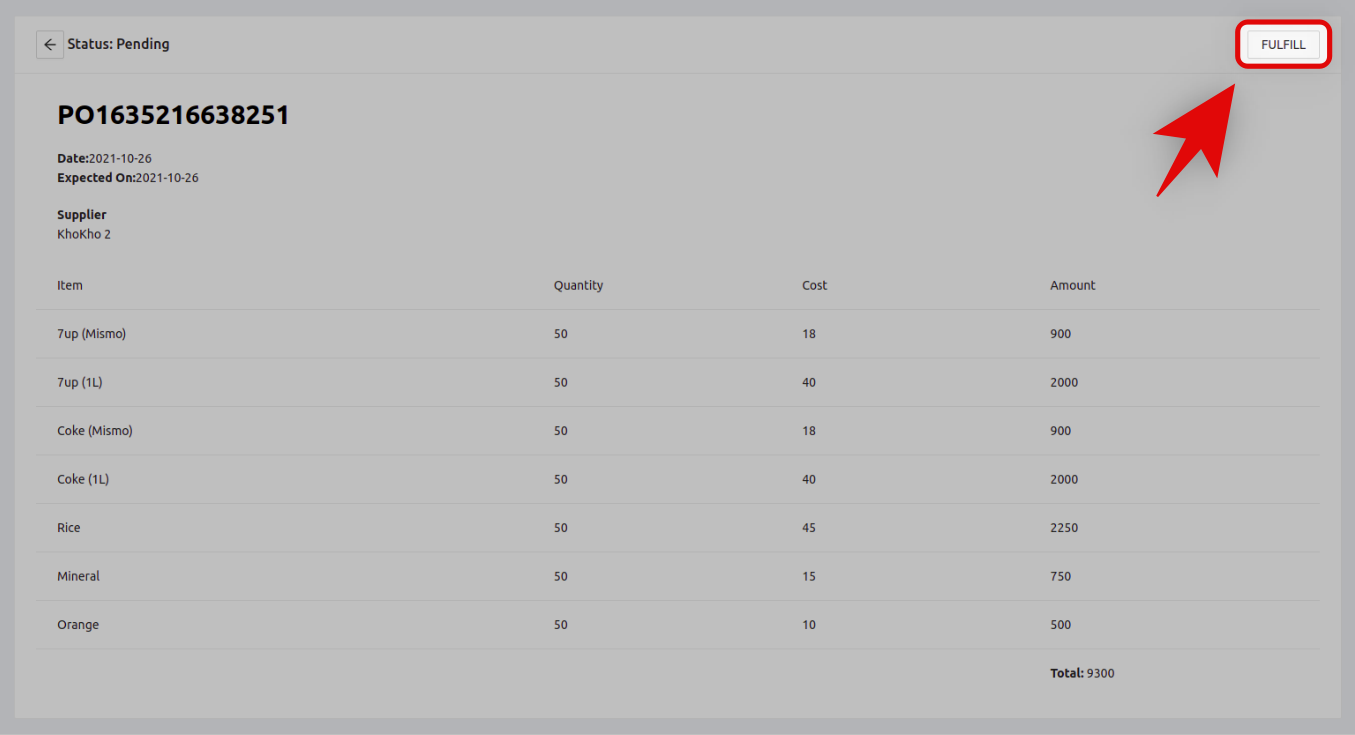
Notice that the status of the purchase order is Pending.
- Click FULFILL on the upper right of your screen to receive your orders. A pop-up window will appear.
- Under Item Fulfill pop-up window, you can...
A. Select Against Warehouse - choose the warehouse where you want to deduct all the ordered items.
B. Mark All Fulfilled - click if you have stocks available for all the items ordered.
C. Item - input order item name.
D. Ordered - input the quantity of the item.
E. Fulfilled - this will automatically be filled if you click Mark All Fulfilled button.
F. To Fulfill - input quantity of the item you want to deduct on your warehouse.
G. Against Item - enter the exact item name ordered by the franchisee.
👏🏻
Yay! You've just received your stock orders.
Sending Purchase Orders
Let's Get Started:
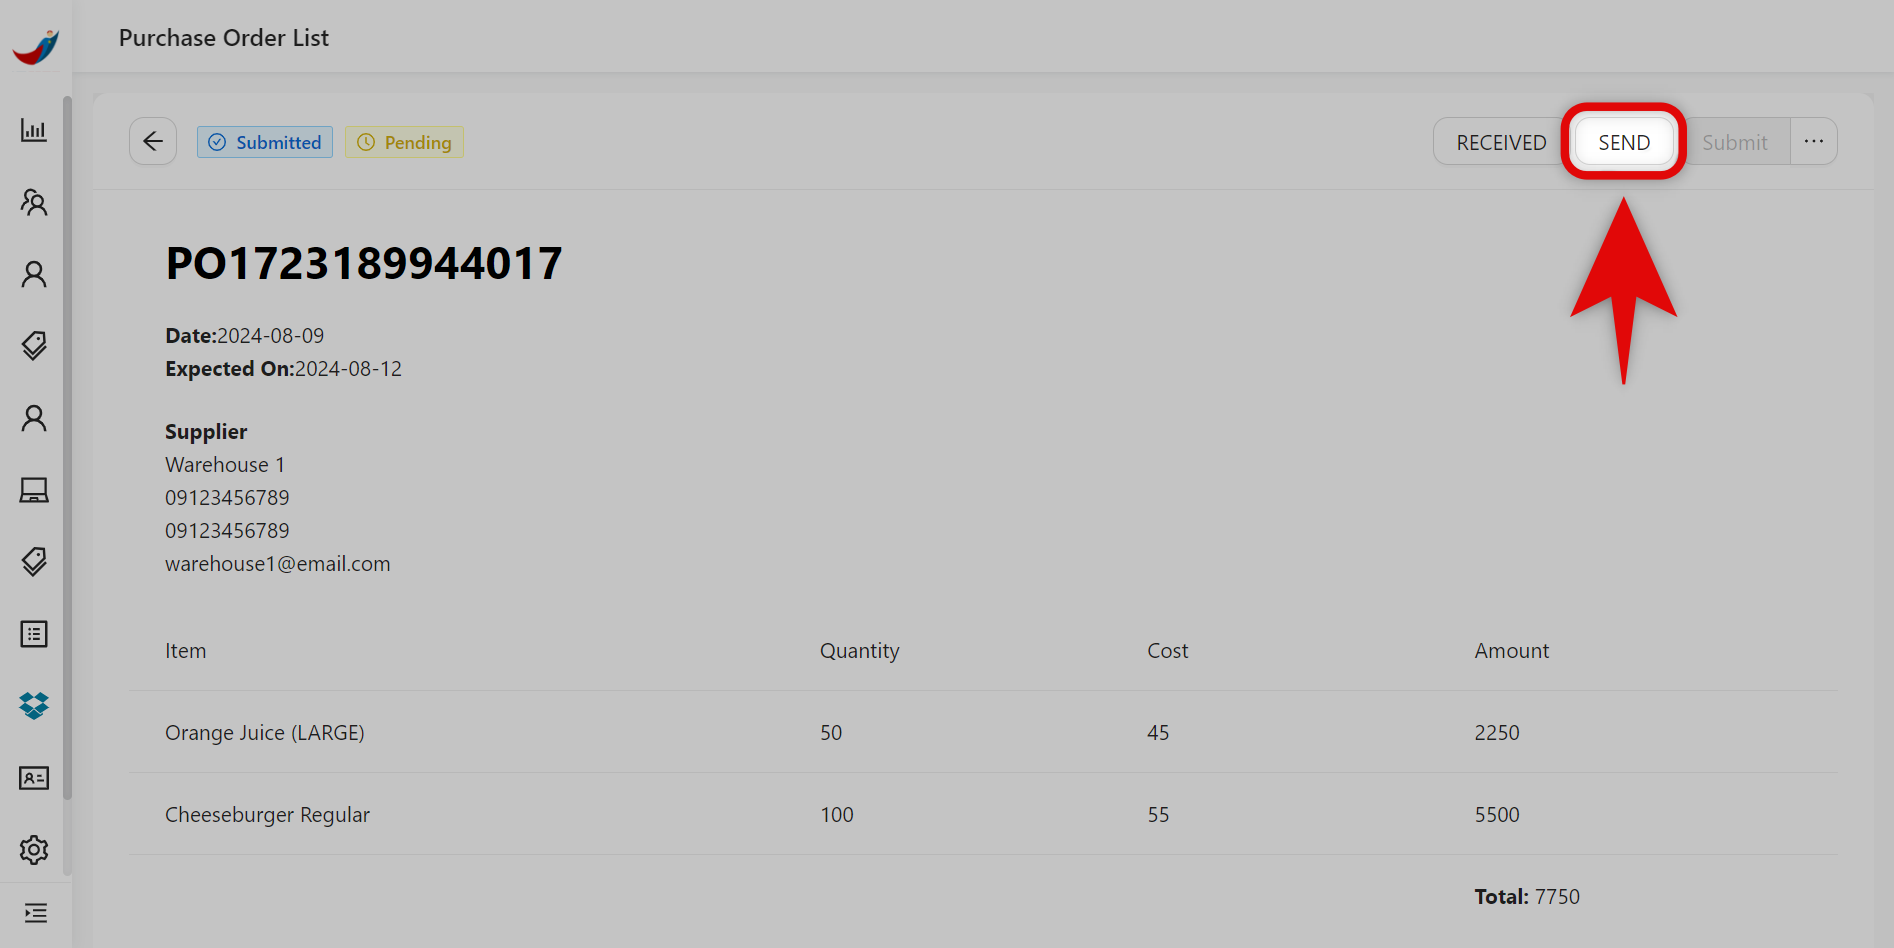
- Click SEND to label your purchase orders as 'Received'.
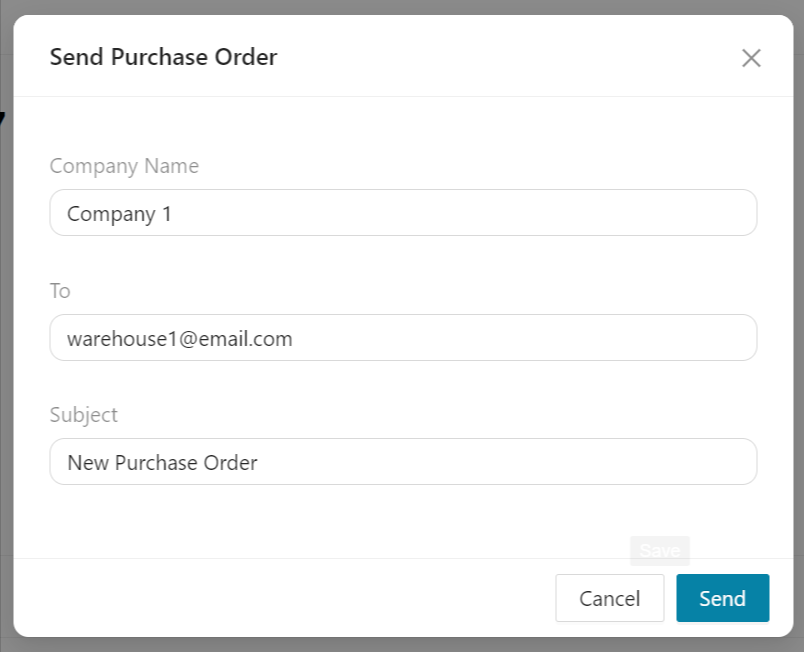
- Under Send Purchase Order pop-up window, you can...
• Company Name - input your company/business name.
• To - input the supplier you would like to address your purchase order.
• Subject - input the subject of your purchase order.
• To - input the supplier you would like to address your purchase order.
• Subject - input the subject of your purchase order.
- Once done, click Send.
- An email of your order will be sent to your supplier.
🤩
Nice! You've just sent your purchase orders.
Generating PDF for Purchase Orders
Let's Get Started:
- On the same page, click on the 3-dots (⋯) icon / More Options > Generate pdf.
- A PDF file of your purchase order will be generated. You can either print or download it.
0:00
/0:08
Generating pdf
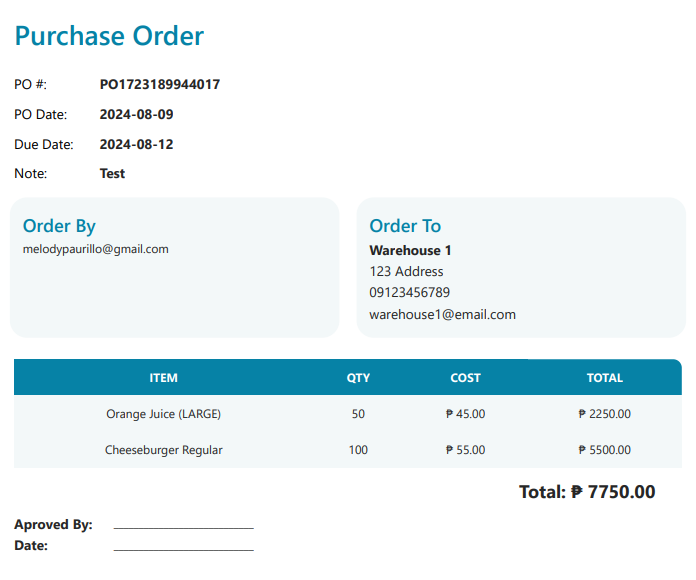
- This is how the PDF file of your purchase order should look like.
🥳
Hooray! You've just learned how to purchase, receive, send, and generate pdf of your orders.
