Step-by-step guide for connection, network, printing, and test-print issues
Device: XPrinter + Tablet / POS Machine
Connection: Wi-Fi Router + Ethernet Cable
1. Before You Start
Use this manual when an XPrinter is connected through Ethernet/Wi-Fi but KaHero POS cannot print, cannot detect the printer, or a test print fails.
Quick checklist
• Printer has paper and the paper is loaded correctly.
• There is no paper jam.
• Power cable is securely connected.
• Ethernet cable is connected from the printer to the Wi-Fi router.
• Tablet/POS is connected to the same Wi-Fi network as the printer/router.
• KaHero POS is open and the correct printer configuration is saved.
2. Printer Has No Power / Does Not Print
Step 1 — Check the power connection
- Turn the XPrinter off.
- Reconnect the power cable firmly.
- Turn the printer on.
- Check whether the printer indicator lights respond.
Step 2 — Check paper and paper jam
- Open the printer cover.
- Confirm paper is installed correctly.
- Remove any jammed paper.
- Close the cover securely.
Step 3 — Check the Ethernet cable
- Disconnect the Ethernet cable from the printer and router.
- Reconnect both ends firmly.
- If available, try another Ethernet cable or router port.
Expected result: The printer powers on normally and is physically connected to the network.
3. Printer Cannot Be Found / Wrong IP Address
Print the printer network configuration report
- Switch the XPrinter OFF.
- Press and hold the FEED button.
- While holding FEED, switch the printer ON.
- Wait for the printer to print the network configuration.
- Release the FEED button after printing.
Locate the IP Address on the printed report. KaHero's Ethernet troubleshooting guide uses this report to verify the printer's network address.
Compare the network
• Check the Wi-Fi network used by the tablet/POS.
• Confirm the printer and tablet/POS are on the same local network/subnet.
• If the printer IP has changed, update the printer IP in KaHero POS.
4. KaHero POS Cannot Print
The official Ethernet setup flow includes adding the printer, selecting Ethernet, entering/searching the printer IP address, configuring paper width/DPI, enabling printer capabilities, and using Test Print.
Check these settings
• Printer Name: Use a clear name such as “Receipt Printer”.
• Connection Type: Ethernet.
• IP Address: Use the IP address printed by the XPrinter network report.
• Paper Width: Select the actual printer paper size, commonly 58mm or 80mm.
• DPI: KaHero's setup guide recommends 180 DPI for the supported configuration.
• Print Receipt / Print Order: Enable the capability required by the store.
Run Test Print
After saving or opening the printer configuration, use Test Print. If the test print succeeds, the printer connection and basic configuration are working.
If Test Print fails
• Recheck the IP address.
• Confirm the tablet/POS is connected to the correct Wi-Fi network.
• Confirm the printer and router are powered on.
• Reconnect the Ethernet cable.
• Restart the printer and router, then test again.
5. Test Print Works but Receipt Does Not Print
If Test Print works but a transaction does not print, check the printer capability and transaction flow.
Step-by-step
- Open KaHero POS printer settings.
- Confirm Print Receipt is enabled for the receipt printer.
- Confirm the correct printer is selected for the intended function.
- Save the configuration.
- Close and reopen KaHero POS if needed.
- Complete a small test transaction and check the receipt.
For kitchen/order printing, verify Print Order and the assigned printer/group/category configuration. KaHero supports separate printer capabilities for receipts, orders, cash drawer, and sticker labels.
6. Receipt Prints but Paper Size Looks Wrong
- Check the paper roll width used by the XPrinter.
- In KaHero printer settings, select the matching 58mm or 80mm paper width.
- Save the setting.
- Run Test Print again.
KaHero's Ethernet setup provides 58mm and 80mm receipt-width options.
7. Printer Disconnects or IP Changes
A printer may stop responding if its network address changes. Print a fresh network configuration report and compare the current IP address with the IP saved in KaHero POS.
Recommended support check
• Record the printer's current IP address.
• Record the IP address currently saved in KaHero POS.
• If they are different, update the printer configuration to the current IP.
• Run Test Print.
• If the issue returns repeatedly, ask the store/network administrator to check the router's IP assignment settings.
8. Basic KaHero App Troubleshooting
Before changing app data, confirm the device has a stable internet connection. KaHero's Basic Troubleshooting guide recommends checking internet connectivity first.
Try these in order
- Close KaHero POS completely.
- Reopen KaHero POS.
- Check the printer configuration and IP address.
- Run Test Print.
- If the issue remains, restart the tablet/POS and printer.
- Test again.
Important: Avoid clearing app storage unless the required account/data precautions have been completed. KaHero distinguishes Clear Storage, which removes app data, from Clear Cache, which removes temporary cached data.
9. Support Escalation Checklist
If the issue remains, collect the following information before escalating:
• KaHero account email.
• KaHero POS app version.
• Android tablet/POS model.
• XPrinter model.
• Connection type: Ethernet/Wi-Fi.
• Printer IP address from the network report.
• IP address saved in KaHero POS.
• Photo of the printer network configuration report.
• Photo/video showing the issue.
• Result of Test Print.
• Exact error message, if any.
Send the complete details to KaHero Technical Support so the team can reproduce and investigate the issue efficiently.
10. Quick Troubleshooting Flow
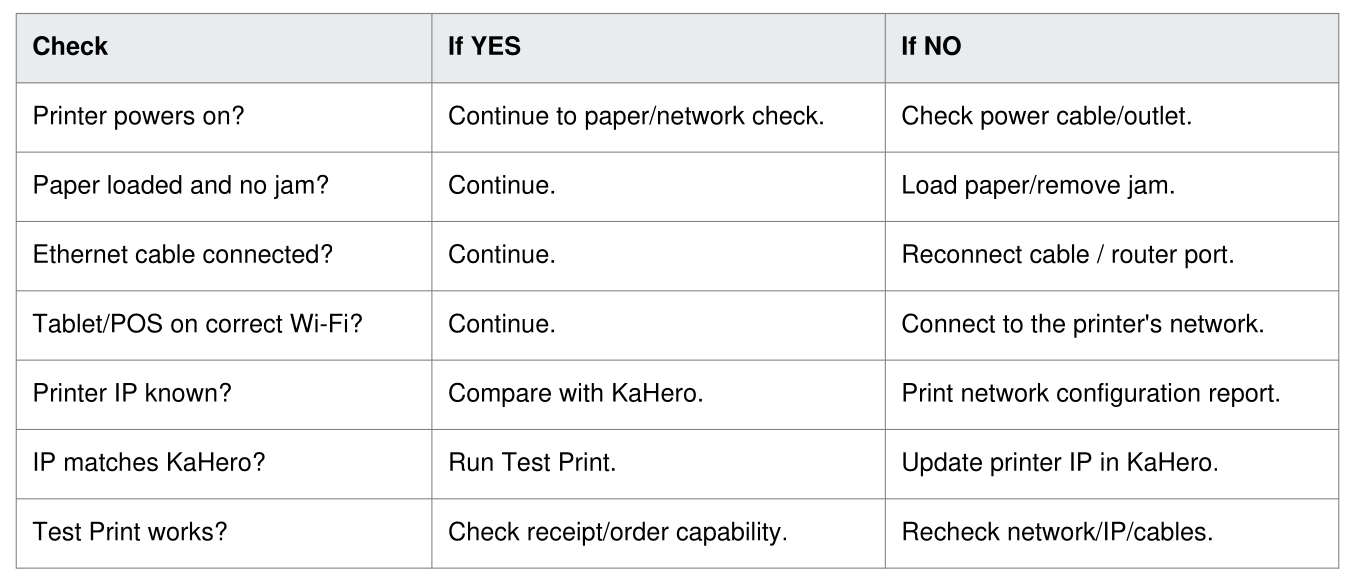
Use this quick decision guide during a client support session: